Showing posts with label America's Test Kitchen. Show all posts

Friday, April 4, 2014

NomNom: M&M Clusters

When I first entered the working world as a pharmacist, I was very much in work mode 24/7. I'd pick up extra shifts to make extra money and had the mentality of 'work/save as much as I can while young and with out responsibilities.' I still somewhat have that mentality but I've also come to realize over the past couple of years that having balance is something that's becoming more and more important to me. Balancing work, time spent with loved ones, blogging to get my creative juices flowing, traveling the world, and practicing yoga for my well being are all things that are important to me for its own reason and I need a good healthy dose of each to keep me happy.

Food and my eating habits also involve this balance I'm talking about today.

I've mentioned in previous posts that I've been trying to eat a bit more healthier these days and not consume so much junk food (chips, fried foods, sweets, etc.) like I usually do, and instead incorporate more vegetables and fruits into my life. So far it hasn't been as bad as I imagined it to be, but I also know myself well enough that I can't give up the "bad for you foods" in its entirety. I enjoy it too much. I'm ok with eating that big slice of cheesecake…and chocolate chip cookie…and bacon…and well you get the idea. It feels so justified after eating a really good spinach salad.


So where does all this talk lead to today?

M&M clusters.

I'm not sure if it's all the carrots and cucumbers I've been snacking on as of late but I've been majorly craving something sweet and salty and this incredibly easy dessert/snack satisfies just that. I first made these clusters over the winter holiday and they have now become a staple in my kitchen because they're incredibly satisfying, easy, and includes ingredients you'll most likely have in your pantry. Warning: there's nothing low fat and healthy about this snack. Oh wait--it has peanuts! Proteins! There you go.

The hardest part about this recipe was waiting for the chocolate to set so I ate my carrots as I waited. True story.

Balance.

I promise my next recipe post will be something super healthy. Have a great weekend. Xo.


Ingredients (Adapted from America's Test Kitchen)
8 ounces of white chocolate, chopped or 1 1/3 cup white chocolate chips
2 cups salted pretzel sticks broken into 1-inch pieces (*make sure you use the thin pretzel rods)
1 cup salted dry-roasted peanuts
1/2 cup mini M&Ms

Procedure
1. Line a baking sheet with parchment paper.  Microwave chocolate in large bowl until melted, about 1 1/2 to 2 minutes.  Stir until smooth and then gently fold in pretzels and peanuts until evenly coated.

2. Drop by heaping tablespoons of mixture onto baking sheet.  Sprinkle M&M’s over the top.  Refrigerate until set, about 30 minutes.

Friday, May 3, 2013

NomNom: Shrimp Pad Thai

Happiness is knowing that you're officially on vacation and leaving for Germany early tomorrow...and this delicious recipe of shrimp pad thai I'm sharing with you today. You're welcome.

Right now I'm feeling a happy kind of stress because I haven't even started to pack yet for this trip (I'm a last minute packer for reals) but thankful that my last day of work before my vacation was yesterday so I have all day today to take care of last minute errands for the trip. The to do list seems to keep on growing though. Why is that?

I've been thinking about the wonderful German food that I'll be indulging in such as schnitzel, pretzels, sauerkraut, beer, etc. which truly makes my mouth water as I type and am beyond excited to happily welcome those foods into my diet tarting tomorrow. Since food has been on my mind, per usual, I figure it would be appropriate to leave you with a food post before I leave....and trust and believe this is a good one.


I've talked about my food cravings on my blog and this pad thai meal was born from just that. For some reason I really wanted to eat pad thai a couple of weeks ago, so I quickly went through my bookmarks from my cookbooks and came across this recipe that's been bookmarked for awhile. Thankfully I had all the ingredients in my kitchen minus the rice noodles which I find ironic since I'm Asian, because instead I had fettuccine noodles in the pantry. Go figure.

There are so many vibrant and balanced flavors in this dish that it kinda awakens your senses and knowing that it's cooked at home makes it even better because of the leftovers. I totally had it the next day eating it straight up cold because there are days I prefer to eat my leftover noodles cold. Such is life.

Knowing that I can successfully make pad thai at home makes it almost embarrassing to order it at a restaurant now. If that happens, just know that it was a do or die craving situation.

Since I will be out of the country for the next couple of weeks my blog will be on vacation as well. My focus is going to be on enjoying and fully embracing a new country but I hope to meet you back here in a about 2 weeks. Thanks for reading:)

Have a great weekend. Xo.

Ingredients (Adapated from America's Test Kitchen) Yields: 4 servings
SAUCE
2 Tablespoons tamarind paste (You can replace tamarind with 1/3 cup of lime juice and 1/3 cup of water, use light brown sugar instead of granulated sugar to give the noodles some color and a faint molasses flavor)
3/4 cup boiling water
3 Tablespoons fish sauce
3 Tablespoons sugar
2 Tablespoons vegetable oil
1 Tablespoon rice vinegar
3/4 teaspoon cayenne pepper
2 Tablespoons chili paste, sambal oelek or sriracha (optional but highly recommended)

NOODLES AND SHRIMP
8 ounces (1/4 inch wide) rice noodles
12 ounces medium shrimp (41 to 50 per pound), peeled and deveined
salt and pepper
pinch sugar
2 Tablespoons vegetable oil
3 garlic cloves, minced
1 shallot, minced
2 larges eggs, lightly beaten
6 ounces (3 cups) bean sprouts
1/4 cup chopped dry roasted peanuts, plus extra for garnish
3 scallions, sliced thin on bias
1/4 cup fresh cilantro (optional)
Lime wedges

Procedure
1. FOR THE SAUCE: Soak tamarind paste in boiling water until softened, about 10 minutes. Push tamarin mixture through fine-mesh strainer into medium bowl to remove seeds and fibers and extract as much pulp as possible. Stir fish sauce, sugar, oil, rice vinegar, and cayenne into tamarind liquid and set aside.

2. FOR THE NOODLES AND SHRIMP: Bring 4 quarters water to boil in large pot, Remove water from heat, add noodles, and let stand off heat, stirring occasionally, until noodles are softened, pliable and just tender about 10 minutes. Drain noodles and set aside

3.  Toss shrimp, 1/8 teaspoon salt, 1/8 teaspoon pepper, and sugar together in medium bowl. Heat 1 tablespoon oil in 12 inch non-stick skillet over high heat until just smoking. Add shrimp in single layer and cook without stirring until beginning to brown, about 1 minute. Stir shrimp and cook until light pink and just opaque, about 30 seconds. Transfer shrimp to bowl, cover to keep warm and set aside.

4. Add remaining 1 tablespoon oil, garlic, shallot, and 1/8 teaspoon salt to skillet, return to medium heat, and cook, stirring constantly, until light golden brown about 1.5 minutes. Stir in eggs and cook, stirring constantly, until scrambled and barley moist, about 20 seconds.

5. Add drained noodles and toss to combine. Add sauce, increase heat to high and cook, tossing constantly until noodles are evenly coated, about 1 minute. Add bean sprouts, peanuts and all but 1/4 cup scallions and continue to cook, tossing constantly until noodles are tender, about 2 minutes.

6. Return shrimp, along with any accumulated juices to skillet and cook until heated through, about 30 seconds. Transfer noodles to serving platter and sprinkle with reserved 1/4 cup scallions; cilantro if using and extra peanuts. Serve with lime wedges.

*Tofu is a good and common addition to pad thai. Add 4 ounces extra-firm tofu, cut into 1/2 inch cubes, to skillet with cooked shrimp in step 6.


Saturday, April 27, 2013

NomNom: Baked Ziti

Hi everyone! Hope you're enjoying the weekend so far. It's beautiful here in Washington, DC and my agenda for the next couple of days will include baking some nutella brownies (!!), meeting up with friends to grab food, and getting last minute errands done before I leave for Germany next week. To kick off the weekend, I made this wonderful one dish wonder of Baked ziti that really was the most perfect, comforting and cheesy filled meal.


I was surprised at how much depth of flavor the dish had and I think it's because whole can tomatoes (instead of crushed) are used and the pasta is actually cooked in the sauce which makes for good sauce absorption. I recommend using whole-milk or low moisture mozzarella cheese versus the pre-shredded kind because well, Test Kichen says it best, "the flavor-to-convenience compromise simply isn't worth it."


I highly recommend making this hearty and comforting meal for your next culinary adventure in the kitchen because it is a guaranteed home run. I promise this recipe will bring a satisfying smile to your face, as it did to mine.

Have a great weekend. Xo.

Ingredients (Adapted from America's Test Kitchen) Yields: 4 servings
1 (28-ounce) can whole peeled tomatoes
1 pound sweet or hot Italian sausage, casings removed (recommend the hot Italian sausage if you like a little spicy kick)
6 garlic cloves, minced
1/4 teaspoon red pepper flakes
Salt and pepper
3 cups water
12 ounce (3 1/4 cup) ziti
1/2 cup heavy cream
1 ounce Parmesan cheese, grated (1/2 cup)
1/4 cup chopped fresh basil
4 ounces whole-milk mozzarella cheese, shredded (1 cup)

Procedure
1. Adjust oven rack to middle position and heat oven to 475 degrees. Pulse tomatoes and their juice in food processor until coarsely ground and no large pieces remain, about 12 pulses.

2. Cook sausage in 12-inch oversafe skillet over medium-hight heat, breaking apart meat until lightly browned and no longer pink, 3-5 minutes. Stir in garlic and pepper flakes and continue to cook until fragrant about 1 minute. Stir in processed tomatoes and 1/2 teaspoon salt. Reduce heat to medium low and simmer gently, stirring occasionally, until tomatoes no longer taste raw, about 10 minutes.

3. Stir in water, then add pasta. Cover, increase heat to medium-high and cook, stirring often and adjusting heat to maintain vigorous simmer until past is tender, 15-18 minutes.

4. Stir in cream, Parmesan, and basil and season with salt and pepper to taste. Sprinkle mozzarella evenly over top. Bake until cheese has elated and browned, 10-15 minutes. Serve immediately.

Friday, April 19, 2013

NomNom: Key Lime Pie

When it comes to desserts, I'm a bit particular with pies. In fact, I'm not the biggest fan. Yea, I know.

Key lime pie is no exception.....until about two years ago. Not sure what exactly happened but the change of attitude began when a friend of mine ordered it for dessert and kinda coaxed me to just give it one more chance. I believe in 2nd chances so I gave it a bite. Or two.

It didn't taste as bad as I remembered it but it wasn't a game changing moment either. It was just okay. I think what happened was that over the years, my palette for all things tart and citrus changed progressively changed. I used to not like anything lemon flavored for the longest time and when I told one of my besties who happens to love anything with a citrus taste, that I was beginning to turn a corner, she was shocked. It was the equivalent of telling someone you started to eat meat when you've been a vegetarian all your life. That sort of caliber.


This recipe tops all the key lime pies I've tasted in the past, meaning I've ordered it from many restaurants. I'm a curious soul by nature, especially when it comes to food, so trust me when I say I've tried them all. The silky smooth texture of the filling is almost custard like but with the addition of some serious citrus punch. It tastes amazing buy itself, especially if you love things tart, but if you want to mellow out the citrus flavor, you can add a dollop of whipped cream. I prefer mine unadorned.


One of the wonderful thing about pies is that it yields many slices. This charming dessert is meant to be shared amongst loved ones over tea or coffee and bonus points if there's good, solid conversation involved.

Have a great weekend. Xo.


Ingredients for Pie (Adapted from America's Test Kitchen)
4 large egg yolks
4 teaspoon grated lime zest plus 1/2 cup juice (5 limes)
1 (14-ounce) can sweetened condensed milk
1 recipe Graham Cracker crust (recipe follows)

Topping (Optional)
1 cup heavy cream, chilled
1/4 cup (1 ounce) confectioner's sugar

Procedure for Pie
1. Whisk egg yolks and lime zest together in medium bowl until mixture has a light green tint, about 2 minutes. Whisk in condensed milk until smooth, then whisk in lime juice. Cover mixture and set aside at room temperature until thickened, about 30 minutes.

2. Meanwhile, prepare and bake Graham Cracker Crust. Transfer pie plate to wire rack. Do not turn off oven. (Crust must still be warm when filling is added).

3. Pour thickened filling into warm pre-bake pie crust. Bake pie until center is firm but jiggles slightly when shaken, 15-20 minutes. Let pie cool slightly on wire rack, about 1 hour. then cover loosely with plastic warp and refrigerate until filling is chilled and set about 3 hours.

4. For the topping, if using: Once pie is chilled, use stand mixer fitted with whisk to whip cream and sugar to medium low speed until foamy, about 1 minute. Increase speed to high and whip until soft peaks form, 1-3 minutes. Spread topping attractively over top of pie.

Ingredients for Graham Cracker Crust
8 whole graham crackers, broken into 1-inch pieces
5 tablespoons unsalted butter, melted and cooled
3 tablespoons sugar

Procedure for Crust
1. Adjust oven rack to middle position and heat oven to 325 degrees. Process cracker pieces in food processor to fine, even crumbs about 30 seconds. Sprinkle melted butter and sugar over crumbs and pulse to incorporate, about 5 pulses.

2. Sprinkle mixture into 9-inch pie plate. Using bottom of measuring cup, press crumbs into even layer on bottom and sides of the plate. Bake until crust is fragrant and beginning to brown 13-18 minutes; transfer to wire rack.


Friday, January 18, 2013

NomNom: Filipino Chicken Adobo

I'm always curious when it comes to native food from other cultures. Whenever I travel to a foreign country, I make it a point to look up food establishments prior to the trip so that I can fully embrace their culture and cuisine and not just "wing it." Although I admit, some of the best food memories I have from my travels have come from recommendations made by local shop owners. Trust me, they know the hidden gems.


I have yet to visit the Philippines and will admit, I am not too familiar in their cuisine; however, I do know "adobo" style of cooking is their thing. It's a style of cooking that either involves meat or seafood which is marinated in a sauce with lots of garlic and vinegar.

I've made this dish several times and it's one of those easy recipes that matches chicken and rice together perfectly. The recipe yields enough sauce where the chicken can absorb the flavors and be drizzled on your rice. Don't you just love that?

The sharp acidity from the vinegar plays so well with the sweetness from the coconut milk and after the chicken has been braising for a couple of hours, the meat just falls apart oh so wonderfully. It's a simple dish that can be part of your dinner rotation with no fuss and sure to please the family.

Have a great weekend. Xo.

Ingredients (Adapted from America's Test Kitchen)
8 bone in chicken thighs, trimmed
1/3 cup soy sauce
1 can coconut milk
3/4 cider vinegar
8 garlic cloves
4 bay leaves
2 teaspoons pepper
1 scallion, sliced (optional)

Procedure
1. Toss chicken w/ soy sauce in large bowl. Refrigerate for at least 30 min and up to 1hr.

2. Remove chicken from soy sauce. Transfer chicken, skin side down to 12 inch nonstick skillet, set aside soy sauce.

3. Place skillet over medium high heat and cook until chicken skin is browned, 7-10 min. While chicken is browning, whisk coconut milk, vinegar, garlic, bay leaves and pepper into soy sauce.

4. Transfer chicken to plate and discard fat in skillet. Return chicken to skin side down, add coconut milk mixture, and bring to boil. Reduce heat to medium-low and simmer, uncovered, for 20 minutes. Flip chicken skin side up and continue to cook, uncovered, until chicken registers 175 degrees, about 15 minutes. Transfer chicken to platter and tent
loosely with aluminum foil.

5. Remove bay leaves and skim any fat off surface of sauce. Return skillet to medium high heat and cook until sauce is thickened, 5-7 minutes. Pour sauce over chicken, sprinkle with scallion and serve.

Friday, December 7, 2012

NomNom: Chocolate Peppermint Sandwiches

The month of December means that we are now entering peppermint flavor galore. I love anything with the hint of peppermint flavor, which means my all time favorite holiday treat (white chocolate peppermint bark) will be consumed in masses. So thankful that I have a gym in my building for seasonal situations such as this.

I mentioned in my last weekend snapshots that I bought the latest America's Test Kitchen magazine which focuses on Holiday cookies and tell me why page 2 had this glorious picture of these chocolate peppermint sandwiches.

I was intrigued. Interest was peaked. This was gonna get baked.

Earlier this week, I took one of my girlfriends out for a birthday brunch and decided to wake up a little earlier that morning to bake these for her. She has kids so I thought that they would love these little holiday treats as well. I wasn't sure what to expect with this dessert since I've never made them, but after taking a bite, or two, or three, into these sandwiches, I was sold. The sandwich texture is the perfect  hybrid of a brownie and a soft chewy cookie. The filling is sweet on its own but having it in between the chocolate sandwich offsets the sweetness and gives the sandwich a great balance. There's also just the right amount of peppermint hint to these fillings that doesn't overwhelm the chocolate flavor. It's pretty much awesome.

When my friend took a bite into these, she laughed and said something along the lines of "this might be really hard to share with my kids." I'm sure she was kidding.....

I hope you're enjoying the month of December and taking in all the holiday festivities that come along with it. If you're in a holiday baking stump, try making this dessert--I promise it will become a seasonal dessert you'll keep coming back to.

Oh, and you can find the interview Washington Life magazine did on me HERE regarding the Military Lady outfit post. Have a great weekend. Xo.


Ingredients (Adapted from America's Test Kitchen: Christmas Cookies): Yields 18 cookies
1 1/2 cup all-purpose flour
3/4 teaspoon baking soda
1/2 teaspoon salt
1 cup (6 ounces) semisweet chocolate chips
3/4 cup packed (5 1/4 ounces) light brown sugar
7 tablespoons unsalted butter, softened
1 tablespoon water
1 large egg, lightly beaten
2 teaspoons whole or low-fat milk
1/8 teaspoon peppermint extract
1/2 cup (2 ounces) confectioners' sugar
Red or green food coloring (optional)

Procedure
1. Adjust over racks to upper-middle and lower-middle poitions and heat oven to 350 degrees. Line 2 baking sheets with parchment paper

2. Whisk flour, baking soda, and salt together in medium bowl. Heat chocolate chips, brown sugar, 5 tablespoons butter, and water in medium sauce pan over medium heat, stirring until smooth. Transfer chocolate mixture to large bowl and whisk in egg until incorporated. Stir in flour mixture until just combined.

3. Working with 2 tablespoons dough at a time, roll into balls and space them 2 inches apart on prepared sheets. Bake until puffed and edges are set but centers are slightly soft, 8-10 minutes, switching on rotating sheets halfway through baking. Let cookies cool on sheets for 5 minutes. Transfer cookies to wire rack and let cool completely, about 45 minutes.

4. Whisk remaining 2 tablespoons butter, milk, and peppermint extract together in medium bowl until combined. Add confectioners' sugar and mix until smooth. If using food coloring, add 3 drops and mix until combined. Spread 1 teaspoon filling over bottoms of half of cookie then top with remaining cookies to form sandwiches before serving.

Monday, December 3, 2012

Weekend Snapshots


This weekend I...

1. Read that there was an Alexis Bittar sample sale happening in NYC and told my sister, who lives in NYC immediately about the sale. She went the last day when they were having an extra 20% off the sample sale prices and came home with these two gorgeous pieces. The bracelet is for me and the necklace is for her. I have the black version of this necklace that I've worn on the blog before so it was a no brainer to tell her to get the piece for herself.

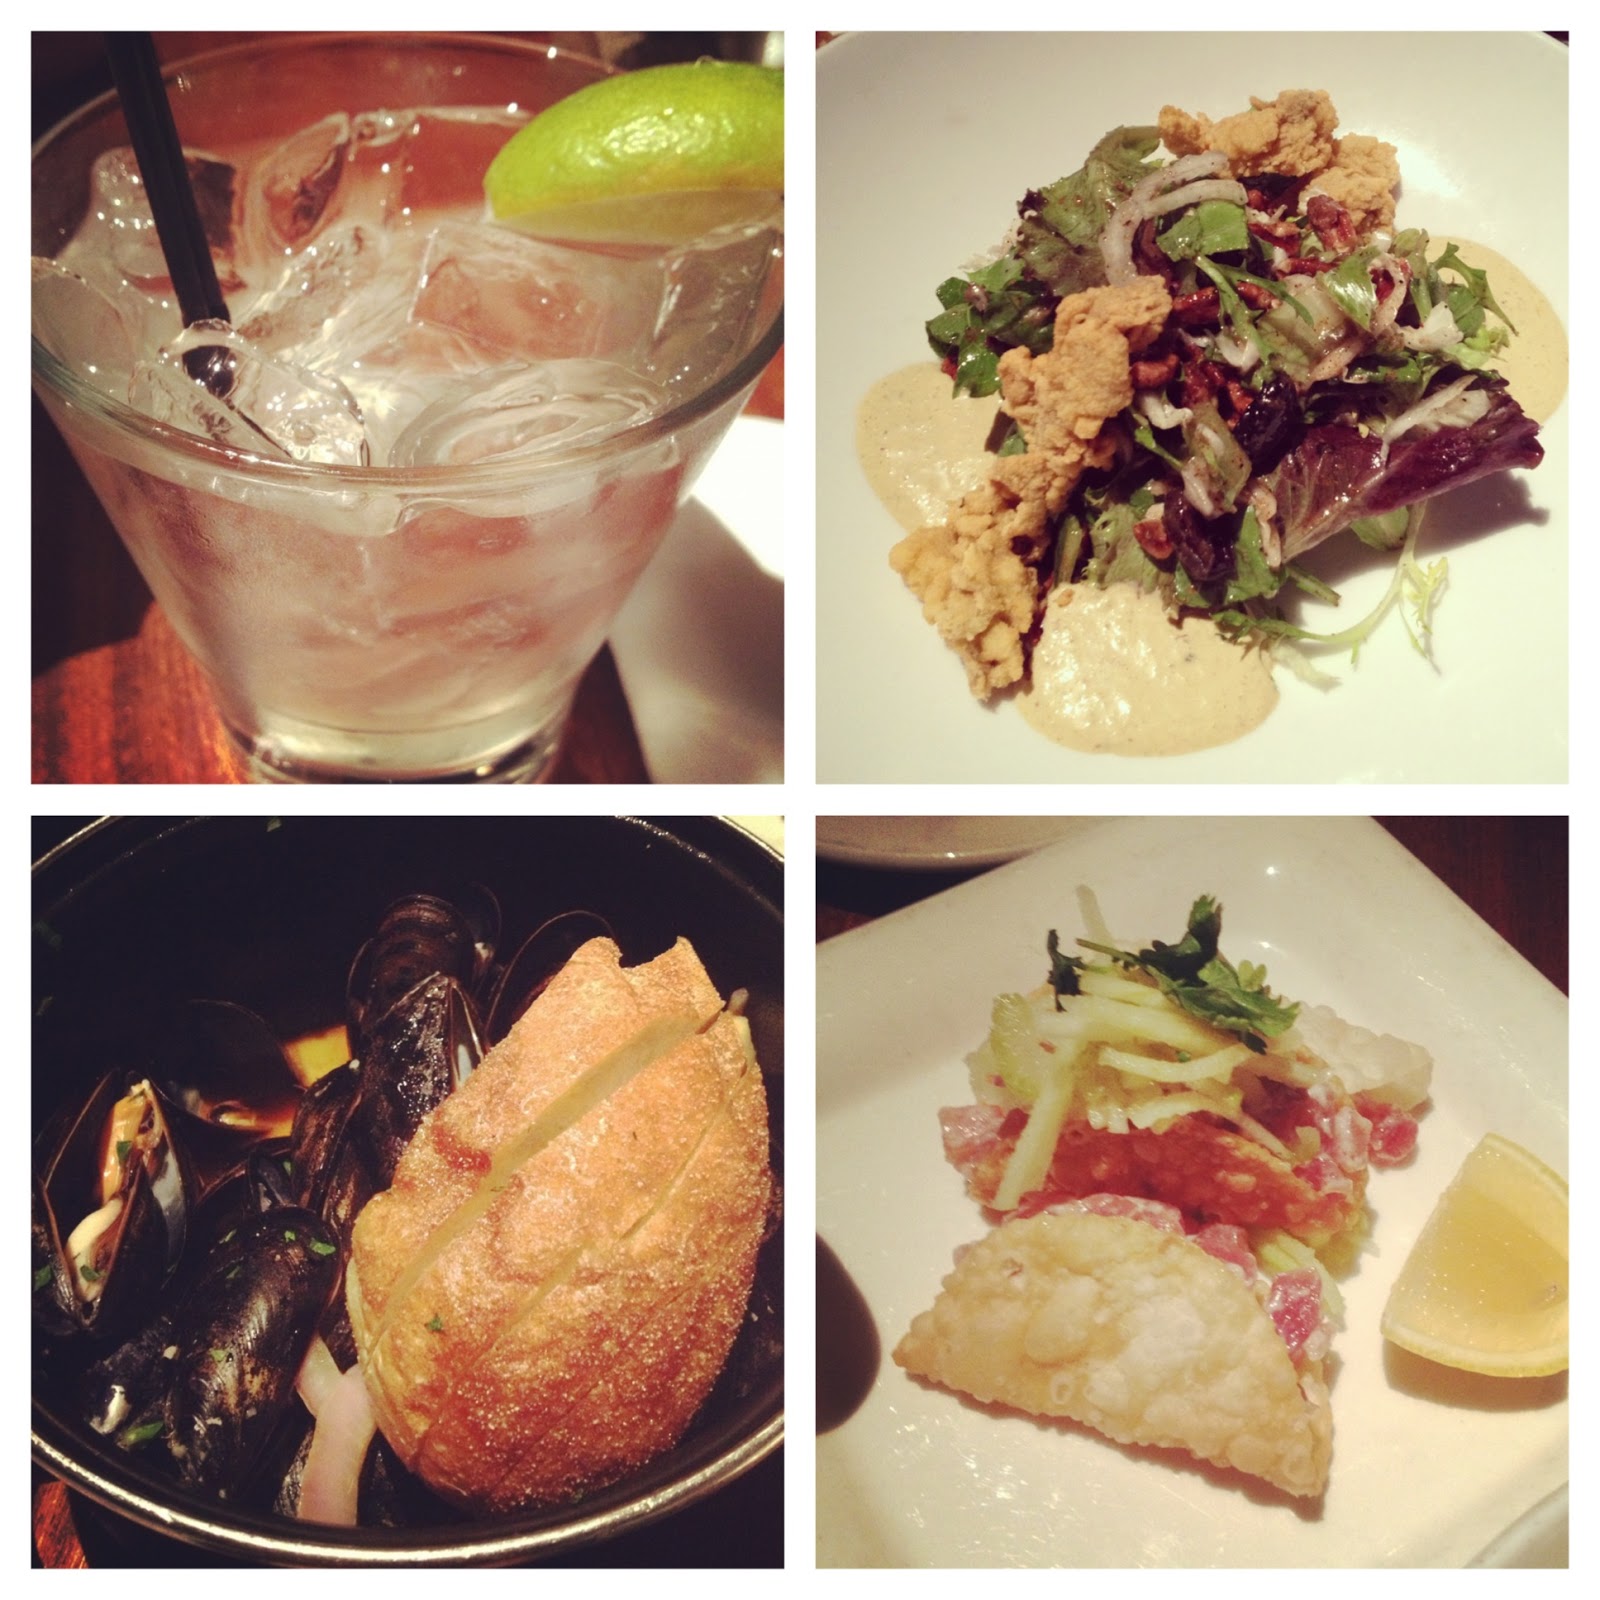
2. Dined at Columbia Firehouse, a cozy and unpretentious restaurant located in Old Town Virginia. We ordered several small plates that consisted of mussels with chorizo and apples, cornmeal crusted oyster salad (best dish) and tuna tartar tacos. The least favorite dish was the tuna tartar due to the bland taste of the dish but that alone wouldn't deter me from coming back to this restaurant again. The drink I ordered was called the Moscow Mule which was a concoction of f lime juice, ginger beer, and stoli. Let's just say I was close to ordering 2 more of these but had to restrain myself from doing so, otherwise my Monday morning wouldn't have been very pleasant.

3. Bought the lastest holiday recipe magazine from America's Test Kitchen and baked a delicious chocolate peppermint sandwich from it. I made the festive dessert this morning so I could bring it for my friend whom I was meeting for brunch. She took a bite and loved it, so I'll be sharing this recipe late this week;)

4. Purchased this YSL clutch that I've been eyeing for awhile. I had a $350 gift card I received from Neiman Marcus after purchasing this Chanel pearl necklace a couple weeks ago and decided to use it on the YSL clutch. My choices were limited since the gift card could only apply to full priced items with jewelry being excluded so this clutch was the obvious choice for me. It's simple yet chic, which is something that comes in handy for frequent wears.

5. Visited the ZooLights at the National Zoo in Washington, DC. Every year around the holidays they put up lights around the zoo and display amazing gingerbread houses made by local kids/adults inside the visitor center. It's free and just a fun way to kick off the holiday season.

How was your weekend?


Friday, July 27, 2012

NomNom: Chicken Chimichangas

I love mexican food and that is a fact. The bright flavors that are usually involved in this cuisine just sings to my food loving heart--no lie. Several years ago I went to visit my friend in San Francisco and he took me to this glorious area known as the Mission District. It is a neighborhood where the majority of the people living there are of Mexican descent so there is obviously a plethora of Mexican food places. Bliss. I had my first taste of a "Mission burrito" and it was pure....joy. Chipotle got nothing on a Mission burrito.


While browsing the magazine section of the supermarket about a month ago, I noticed the new issue of Cook's Illustrated with the title in bold print: "Mexican Favorites." Now I don't know if you've noticed by now, but I am a huge fan of recipes from the fine people of Cook's Illustrated/America's Test Kitchen, so it was an obvious decision to buy the magazine. Zing.

The first thing I decided to cook was this chicken chimichanga recipe and am SO happy I did because it really set the bar for my expectations on the rest of the recipes in the magazine. I love chimichangas because it's a burrito with a twist. It has a little oomph in it because these babies are deep fried. Can you just picture what happens to the fillings when it enters that oil, all rolled up in a tortilla? The cheese gets oozy and the tortilla shell becomes crispy and slightly flaky. It's glorious.

These are best eaten hot out of the oil with toppings such as sour cream, guacamole, and salsa. I made a quick pico de gallo prior to making the chimichangas so the flavors could marinate in the fridge while I was prepping the chimichangas. Good decision on my part.

Please make these so we can share our penchant for Mexican cuisine. Have a great weekend. xo.


Ingredients (Adapted from Cook's Illustrated: Mexican Favorites 2012) Serves 4
1 1/4 cup low-sodium chicken broth
1 tablespoon minced canned chipotle chile in adobo sauce
1/2 cup long-grain white rice
salt and pepper
2 (6-ounce) boneless, skinless chicken breasts, trimmed
1 tablespoon plus 3 cups peanut or vegetable oil
1 onion, chopped fine
2 garlic cloves, chopped fine
1 teaspoon chili powder
1/2 teaspoon ground cumin
1 (15-ounce) can pinto beans, rinsed
4 ounces sharp cheddar cheese, shredded (1 cup)
1/3 cup chopped fresh cilantro
1 tablespoon all-purpose flour
1 tablespoon water
4 (10-inch) flour tortillas

Procedure
1. Whisk broth and chipotle together in 2 cup liquid measuring cup. Combine 1/2 cup chipotle broth, rice, and 1/4 teaspoon salt in bowl. Cover bowl and microwave until liquid is completely absorbed, about 5 minutes. Meanwhile, pat chicken dry with paper towels and season with salt and pepper.

2. Heat 1 tablespoon oil in Dutch oven over medium-high heat until just smoking. Add onion and cook until softened, about 5 minutes. Stir in garlic, chili powder, and cumin and cook until fragrant., about 30 seconds. Add remaining 3/4 cup chipotle broth, parcooked rice, and beans and bring to boil.

3. Reduce heat to medium-low, add chicken and cook, covered, until chicken registers 160 degrees and rice is tender about 15 minutes, flipping chicken halfway through. Transfer chicken to cutting board and let rest for 5-10 minutes. Cut chicken into 1/2 inch pieces and combine with rice and bean mixture, cheddar, and cilantro in large bowl. Wash now-empty pot.

4. Whisk flour and water together in bowl. Stack tortillas on plate and microwave, covered, and pliable, about 1 minute. Working with 1 at a time, place one-quarter of chicken mixture in center of warm tortilla. Brush edges of tortilla with flour paste. Wrap top and bottom of tortilla tightly over filling. Brush ends of tortilla with paste and fold into center, pressing firmly to seal.

5. Heat remaining 3 cups oil in clean pot over medium-high heat to 325 degrees. Place 2 chimichangas, seam side down, in oil. Fry, adjusting burner as necessary to maintain oil temperature between 300 and 325 degrees, until the chimichangas are deep golden brown about 2 minute per side. Drain on wire rack and set inside rimmed baking sheet. Bring oil back to 325 degrees and repeat with remaining chimichangas. Serve.

Friday, June 1, 2012

NomNom: Rice Salad w/Tomato, Parmesan, and Basil

Basil is one of my favorite herbs to use during the summer. I love the earthy smell to it and how much of a herb-y flavor profile it adds to dishes. Growing my own basil means that pesto is heavy on rotation and Caprese salad (my faaaavorite summer salad) is also made frequently. If there's a recipe that uses basil, I'm all over that piece.


Perhaps it's because the ingredients involved reminded me of a Caprese salad that really got my intrigued but truth be told, I was a bit skeptic at how this recipe would taste when I first came across it. Being Asian, I'm used to having my rice unadorned and pretty much keeping it simple.

But I'm a curious one. I like to try new things and rarely will I say no.Unless it involves snakes.

So basically I found another dish to add to my favorite recipe list. This dish is the perfect summer recipe because it has light and bright flavors that shine through with each bite. The nutty Parmesan cheese mixed in with the freshness of the tomatoes and basil is prominent through and through, especially since a heavy dressing isn't involved. It's a simple (yay!), delicious dish involving healthy ingredients that is filling enough to eat as main dish OR could be eaten as side dish. I think I just gave you a two for one deal.

What more could you ask for?

Have a great weekend.

Ingredients (Adapted from America's Test Kitchen Light and Healthy 2012)
1 1/4 C long-grain white rice
salt and pepper
1 tomato, cored, seeded, and cut into 1/2-inch pieces
1 ounce parmesan cheese, grated (1/2 cup)
1/.4 cup shredded basil
4 teaspoons balsamic vinegar
1 garlic clove, minced
5 teaspoons extra virgin oil

Procedure
1. Bring 3 quarts water to boil in large pot. Add rice and 1 teaspoon salt and boil, stirring occasionally, until rice is just tender, 9-12 minutes. Drain rice well, spread on rimmed baking sheet, and let coll to room temperature, about 30 minutes.

2. Toss cooled rice, tomato, Parmesan, and basil together in large bowl. Whisk vinegar, garlic, and 1/2 teaspoon salt together in small bowl. Whisking constantly, drizzle in oil. Pour dressing over salad and toss to combine. Season with salt and pepper to taste, and serve.


Wednesday, May 16, 2012

NomNom: Mini Cinnamon Rolls

Several weeks ago, my friend, who currently lives in Arizona emailed me saying that she would be in town and wanted to get together to catch up. She moved to Arizona as soon as we both graduated pharmacy school to take a job position there so those days where we would see each other every.single.day for 4 years turned scarce after graduation. We bounced back ideas on places to eat and I figured why not just invite her over my place (she hasn't seen it since I moved) and cook brunch for her. She was SUPER eager with this idea, go figure.

It's a personal thing when you invite a friend over to your home and cook for them. A lot of thought and love goes into prepping for the menu and obviously much love goes into what you're cooking. I wanted to do this for her because I appreciate her friendship. She's one of the most down to earth, kind, unfussy girls you'll ever meet and this was especially shown when I went to visit her in Arizona last year. 

My flight was over 2 hours delayed and I was starving by the time I had landed. Since I was in mid flight there was no way of letting her know that the first thing I wanted to do was eat something asap. When I landed, she somehow knew (smart girl, I tell ya) that I'd be hungry and greeted me with a hug and sandwich in hand. So thoughtful, right? It's always those acts of kindness from people that makes a mark on me. Always. There are several other acts of kindness that happened during my visit, but I'll leave those stories for my next recipe post.

 
I already had a savory dish in mind to make that morning (a fantastic quiche recipe coming soon) but needed something sweet to add to the menu. I made these extremely easy, moist, and magnificent mini cinnamon rolls before and decided to make these again because it just seemed to fit the part for brunch. Now, when I say easy, I'm talking about using store bought dough! Total time saver! All you have to do is brush the dough with glorious amounts of sugar and cinnamon and roll that baby up.

Roll then cut. Easy.

Bake them in mini muffin pans to help maintain the shape. Brilliant!!!

Eat immediately while warm. Immediately.

So the original recipe called for the icing to be made from maple syrup but when I tried to make the icing based off that recipe, the icing came out too watery. The consistency was way off even though I kept trying to add more sugar to it. So this time, I used Test Kitchen's recipe for cinnamon roll icing and hit the jackpot. Yea, baby.

Ingredients for rolls (Adapted from www.iowagirleats.com) Yields 14
1-8oz tube crescent roll dough
2 Tablespoons butter
cinnamon
brown sugar

For the icing (Adapted from America's Test Kitchen)
2 Tablespoons of buttermilk
2 Tablespoons cream cheese, softened
1 cup of confectioners' sugar

Procedure
1. Preheat oven according to crescent roll dough package directions. Layout half the dough (4 triangles) and pinch all the seams together. Flip over and pinch the seams on the back side together too.

2. Using a rolling pin, smooth the seams and roll the dough into a square about 1/4″ thick. Brush with half the butter, and sprinkle with as much cinnamon and brown sugar as you want. Roll into a log and cut into 8 pieces.

3. Place mini cinnamon rolls into a non-stick sprayed mini muffin tin. Repeat steps 1 and 2 with the other half of the crescent roll dough. Bake according to package directions. Cool about 5 minutes before glazing.

4. Meanwhile, whisk the cream cheese and buttermilk in a large bowl until thick and smooth (the mixture will look like cottage cheese at first). Sift the confectioners’ sugar over the mixture and whisk until a smooth glaze forms about 30 seconds.

5. Spoon the glaze evenly over the buns; serve immediately.

Friday, April 27, 2012

NomNom: Shrimp Burgers with Creamy Chipotle Chile Sauce

I have a funny relationship with seafood. Back when I was in college I endured the most excruciating stomach pains ever--I got food poisoning from seafood. The night before, my friends and I went to eat at a seafood buffet and I must have consumed something bad because that whole night and following morning I was throwing up and running to the bathroom. Things were coming out from both holes (I'm sorry if that was TMI but that's the truth!!) and I had the worst stomach pains. Ever. I had to be rushed to the hospital because my stomach hurt so bad that it became this whole ordeal of having to be wheel chaired in because I was in so much pain to walk and the nurses putting IVs in me due to dehydration. Truly the worst experience with food.

After going through that, you can only imagine how much I steered clear of (raw) seafood for many, many moons--specifically anything raw shellfish. I've sloooooooowly started to incorporate seafood back into my diet a couple years ago but I'm still somewhat hesitant when a friend is like, "let's get oysters!" Ever since my food poisoning incident, I've felt indifferent towards certain seafood such as shrimp and crabs. They're aiight.


As I was perusing through my America's Best Kitchen magazine (best recipe source btw) I came across this shrimp burger recipe. I've never had shrimp in a burger form before and thought it might be worth exploring because the shrimp would be would be pulsed in a food processor so it wouldn't look like I'm eating shrimp. Am I weird for justifying it like that? Maybe.

Let me tell you--I was so very extremely and pleasantly surprised at how these burgers came out, so much so that I made it twice in one weekend. For reals. Have you tried crab cakes? Well, this has a very similar texture to crab cakes and good grief it is SO NOMNOMNOM. I can't even tell you. The recipe calls for simple seasoning and as the recipe mentions, the lemon zest really does accentuate the sweetness of the shrimp. Another great thing about it, is that it's much healthier for you than a regular beef burger. Win.

Top it off with the creamy chipotle chile sauce (highly recommend), fresh tomatoes, and your favorite burger topping, and you'll thank me for this recipe.

Have a great weekend.

Ingredients for Shrimp Burgers, Serves 4 (Adapted from America's Test Kitchen)
1 slice of hearty white sandwich bread, torn into 1-inch pieces
1 lb shrimp, peeled, deveined, and tails removed
3 tablespoons light mayonnaise
2 scallions, sliced thin
2 tablespoons minced fresh parsley
1 teaspoon grated lemon zest
1/4 teaspoon salt
1/4 teaspoon pepper
Pinch cayenne pepper
2 teaspoons canola oil
4 hambuger buns

Procedure
1. Pulse bread in food processor to coarse crumbs, about 4 pulses and transfer to bowl (you should have about 3/4 cup crumbs). Wipe food processor clean and pulse shrimp until there is an even mix of finely minced and coarsely chopped pieces, about 7 pulses.

2. Whisk mayonnaise, scallions, parsley, lemon zest, salt, pepper, and cayenne together in large bowl until uniform, Gently fold in processed shrimp and bread crumbs until just combined.

3. Scrape shrimp mixture onto small baking sheet each into 1-inch thick patty. Cover with plastic wrap and refrigerate for 30 minutes.

4. Heat oil in 12-inch nonstick skillet over medium-high heat until shimmering. Gently lay shrimp burgers in skillet and cook until crisp and browned on both sides, 8-10 minutes., Place burgers on buns and serve.

Ingredients for Creamy Chipotle Chile Sauce
1/4 cup light mayonnaise
2 tablespoons low-fat sour cream
1 tablespoon lime juice
2 teaspoons minced fresh cilantro
1 garlic clove,inced
1/2 teaspoon minced canned chipotle chile in adobo sauce
water
salt and pepper

Procedure
Combine mayonnasie, sour crea, lime juice, cilantro,m garlic and chipotle in bowl, dd water as needed to thin sauce consistency and season with salt and pepper to taste. Cover and refrigerate to 30 minutes before serving.